News
I've been getting a LOT of requests for me to release the Painter3D files for UT, so, for those of you that are lucky enough to have Painter3D here is the .p3d and 1024x1024 skin for the characters.
News
I've been getting a LOT of requests for me to release the Painter3D files for UT, so, for those of you that are lucky enough to have Painter3D here is the .p3d and 1024x1024 skin for the characters.
|
Painter 3D Files PC Versions |
Painter 3D Files Mac Versions |
Ok, I've been getting a lot of questions about skinning stuff, so, I've created a Frequently Asked Questions Section so head on over and check it out.
________________________________________________________________________
I'm designing this page so everyone out there can see the new method we are using to make the skins for Unreal Tournament, and to give you the info that you need to make your own skins for UT.
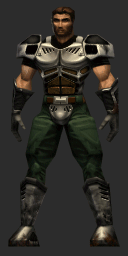
This little tutorial will show you how to make skins for the male player model I made. Soon I'll post templates for my female as well as the male and female that James Schmalz made, if everyone would like. This is enough to get everyone started, at least.
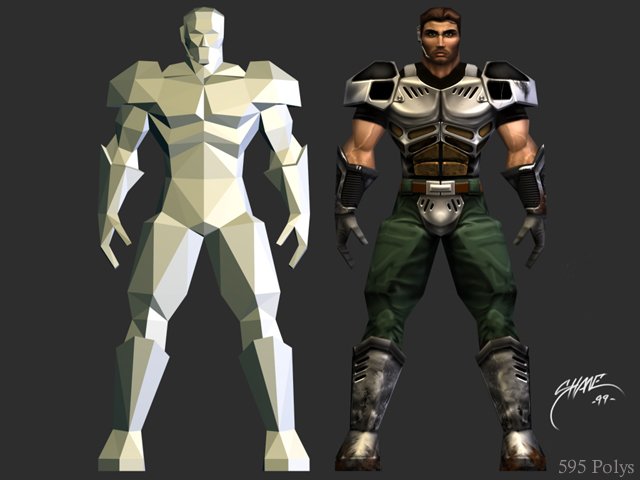
First of all, there are 2 male and 2 female player models in UT. Their skins are four times the resolution of Unreal skins, and are skinned with 4 textures. We did this for 2 reasons. The first reason is that 3dfx hardware will only support textures up to256x256. The second reason is, parts of the skins will be interchangeable like the faces, the (chest/arms, legs/boots) for team colors.
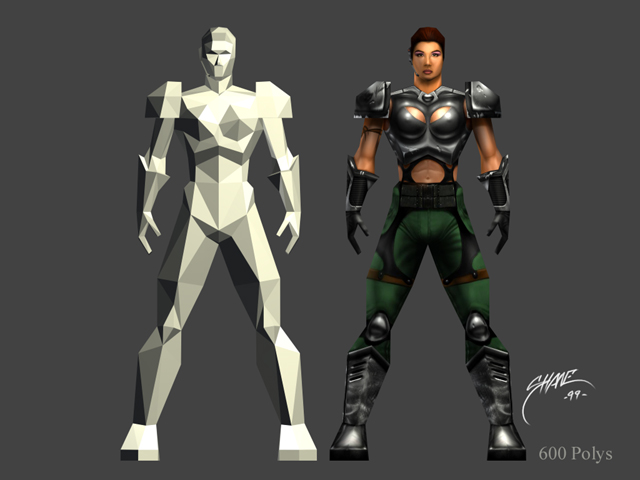
We use Painter 3D to do our skins, and we usually do them at twice the resolution than the final one will be, and then scale them down. Since our skins are done in Painter 3D they are one texture, then we have to chop them up into 4 256x256 textures.
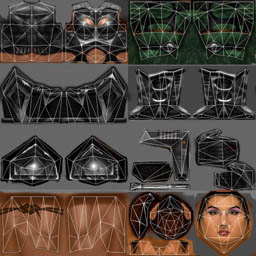
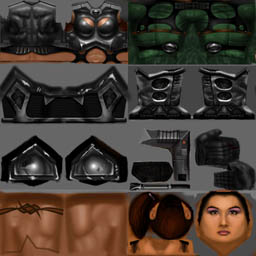
You can click on any above image to go to the1024x768 version.
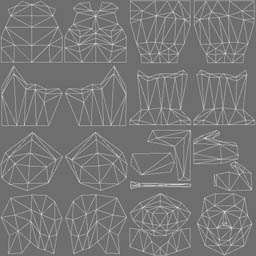
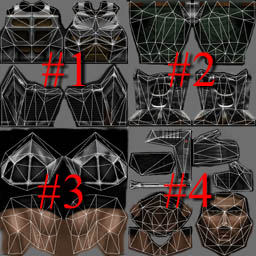
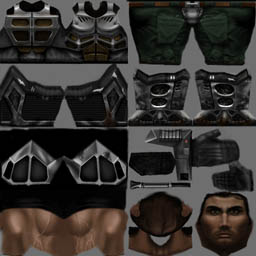
You can click on any above texture to download the 1024x1024 tif file.
Once you have painted your skin you now have to scale it down to 512x512.
Now chop it into 4 256x256 textures, the best way to do this is in Photoshop by setting your grid to 256 and use the crop tool.
If you want the wireframe textures already chopped up into the 4 512x512 pieces you can get a zip file here. If you use these, remember to scale each one down to 256x256 before you import them.
________________________________________________________________________
Female Soldier
You can click on any above image to go to the1024x768 version.
You can click on any above texture to download the 1024x1024 tif file.
Once you have painted your skin you now have to scale it down to 512x512.
Now chop it into 4 256x256 textures, the best way to do this is in Photoshop by setting your grid to 256 and use the crop tool.
If you want the wireframe textures already chopped up into the 4 512x512 pieces you can get a zip file here. If you use these, remember to scale each one down to 256x256 before you import them.
Naming and Importing
Note: This is an example for the MaleSoldier.
Now you need to know how to name your skin pieces so that they will work right with the new system. You need to use a 4 letter base name like...
sldr1.pcx = base chest/ back
sldr1t_0.pcx = Red team version of chest/ back
sldr1t_1.pcx = Blue team version of chest/ back
sldr1t_2.pcx = Green team version of chest/ back
sldr1t_3.pcx = Yellow team version of chest/ back
sldr2.pcx = base legs/boots
sldr2t_0.pcx = Red team version of legs/ boots
sldr2t_1.pcx = Blue team version of legs/ boots
sldr2t_2.pcx = Green team version of legs boots
sldr2t_3.pcx = Yellow team version of legs/ boots
sldr3.pcx = base arms/ shoulder pads
sldr4.pcx = base face/ hair/ neck/ headset/ hand/ boot bottom
sldr4Johnson.pcx = a face called Johnson, which will show up in the face selction menu.
sldr5Johnson.pcx = a 64x64 portrait of Johnson's face used in the HUD when Johnson talks.
You can make as many face variations as you want, and use any 4 letters for the initial name.
Once you have all that done, you can import them into a .utx file in UnrealEd, make sure to name it SodlierSkins_Whatever.utx.
Example (SodlierSkins_MySkins.utx), and save it in the textures directory just like normal.
(DO NOT import them into the existing SoldierSkins.utx or you will get a version mismatch error when playing online)
Creating a .int file for your skins
Now you need to make a .int file for you skins, Name it SoldierSkins_MySkins.int just like you did for the utx. This is just a plain text file that goes in in the UnrealTournament/System directory that tells the engine how to use the skins.
Below is an example of one style in the male Soldier's int file.
(where SoldierSkins is, replace it with the name of the .utx file you put your skins in) ie..SoldierSkins_MySkins
(where sldr is replace it with the 4 leter base name you used)
[public]
Object=(Name=SoldierSkins.sldr1,Class=Texture,Description="Soldier")
("Soldier"
is the name your skin style will
show up as)
Object=(Name=SoldierSkins.sldr2,Class=Texture)
Object=(Name=SoldierSkins.sldr3,Class=Texture)
Object=(Name=SoldierSkins.sldr4,Class=Texture)
Object=(Name=SoldierSkins.sldr4Johnson,Class=Texture,Description="Johnson")
( Replace
"Johnson" with
the name you used)
Object=(Name=SoldierSkins.sldr4Harlin,Class=Texture,Description="Harlin")
(Replace"Harlin"
with the name you used)
Object=(Name=SoldierSkins.sldr4Harlin,Class=Texture,Description="Smith")
(Replace"Smith"
with the name you used)
Object=(Name=SoldierSkins.sldr5Johnson,Class=Texture)
Object=(Name=SoldierSkins.sldr5Harlin,Class=Texture)
Object=(Name=SoldierSkins.sldr5smith,Class=Texture)
Object=(Name=SoldierSkins.sldr1t_0,Class=Texture)
Object=(Name=SoldierSkins.sldr1t_1,Class=Texture)
Object=(Name=SoldierSkins.sldr1t_2,Class=Texture)
Object=(Name=SoldierSkins.sldr1t_3,Class=Texture)
Object=(Name=SoldierSkins.sldr2t_0,Class=Texture)
Object=(Name=SoldierSkins.sldr2t_1,Class=Texture)
Object=(Name=SoldierSkins.sldr2t_2,Class=Texture)
Object=(Name=SoldierSkins.sldr2t_3,Class=Texture)
I hope this helps everyone out there that is interested in making skins for Unreal Tournament.